Introduction | Tank – How to | Tank – Examples | Atmospheric_Examples | Theory | For_Teachers | Wiki
We can study convection in a laboratory setting using the apparatus sketched in the diagram below.
Fig.1 Apparatus for studying convection. Heat is supplied from an immersion heater above which is a grid with many small holes. Buoyant fluid bubbles up from below through the grid. The water above can be homogeneous, layered or stratified.
The convective elements themselves can be revealed by seeding with (very small) amounts of potassium permanganate or dye, illuminated from the rear and viewed from the front. Convection from localized sources can also be studied by blocking, as appropriate, regions of the grid. Convection can also be triggered from above through the use of ice cubes.
We take our tall (16”), thin (3” deep) tank and place the immersion heater in the bottom. The fine grid is put in place over the top. An acrylic white sheet is clamped to the back of the tank for illumination. For projection to a large class, or recording purposes, the tank can then be placed on the turntable and viewed from the camera above through use of a tilted mirror, as sketched in the diagram. Note that here the turntable is being used as a platform rather than as a spin device (although one can use the system to study rotating convection too!).
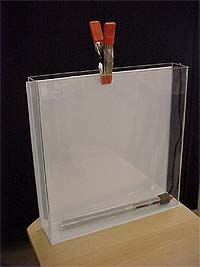
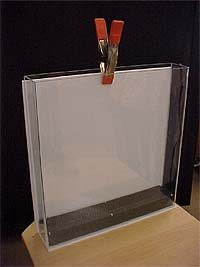
Fig.2 On the left we see an immersion heater on the base of the tank. On the right the heater has been covered by a grid providing a horizontal surface covered by many tiny holes through which water, warmed through contact with the heater, percolates.
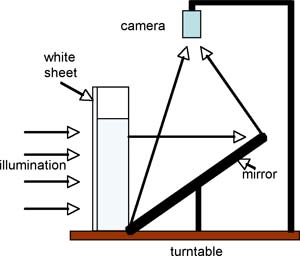
Fig.3 Through use of a mirror, the experiment can be recorded or projected using the overhead camera.
The tank is then filled up with water. Several filling options can be used to set up different stratifications:
- unstratified: the tank is filled up with water at room temperature
- two-layer: salty water is used to fill the tank up to a depth of, say, 6”, and then fresh water is floated on top using a funnel connected to a diffuser. The fresh water (or indeed the salty water) can be dyed slightly to reveal the two-layer stratification more clearly – see Fig.3
- more continuous stratification: we have experimented with a number of simple methods. One that is sufficient for some purposes is to set up the two-layer stratification as in (ii) and then drag a coarse grid vertically, up and down, through the column. After 2 or 3 vertical sweeps, the fluid is allowed to settle. The stirring breaks down the initial two-layer stratification and replaces it with one which is more continuously stratified.
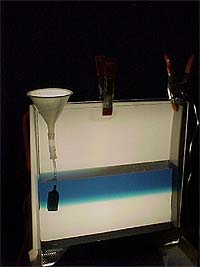
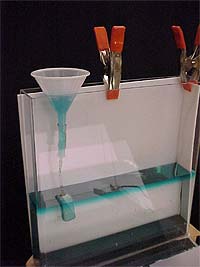
Fig.4 We see a two-layer stratification being set up through use of a funnel and porous pot. The clear fluid is salty: the dyed fluid is fresh.
The tank can be stratified using salt or heat. Salt has the advantage that it will remain for many hours and there are no problems associated with heat insulation. Very strong stratifications can be set up with salt. Heat has the advantage that the stratification can be measured using thermometers.
Once the working fluid has been stratified – by whichever method – and has been allowed to settle down for a minute or two, the heater is plugged in to the mains.
Note that the heater should never be switched on if it is not immersed in water. Otherwise it will overheat and fail.
The evolution of the convection is best viewed by sprinkling in (very small) amounts of potassium permanganate crystals, a shown below.
Thermometers attached to the side of the tank, can be used to measure the evolution of the temperature at various heights above the bottom.
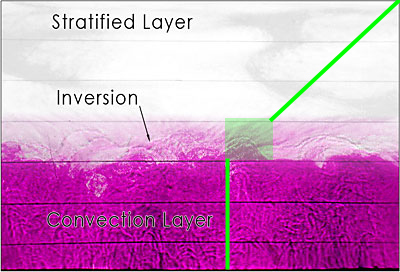
Fig. 5 A snapshot of the convecting boundary layer in the laboratory experiment. Note the undulations on the inversion caused by convection overshooting the well-mixed layer below into the stratified layer above. The green line indicates the approximate temperature profile on the tank.
Within the convection layer, the temperature is well mixed and constant as indicated by the vertical green line. The shaded green box indicates the inversion region. Warm water plumes rising from the convection layer overshoots the inversion due to its own momentum. While the plume rises above the inversion, water from above the inversion displaces the rising plume thereby introducing water of different temperatures. Above the transitional inversion layer, the water is stable and the temperature increases linearly with height.