Introduction | Tank – How to | Tank – Examples | Theory | Wiki
We take our clear square 16” x 16” tank and position it on the center of the turntable. We place inside a snugly fitting white acrylic sheet propped up along one edge to provide a tilted bottom, as shown in Fig.1. The varying depth of the tank mimics the variation in the depth of the spherical shell measured in the direction parallel to the rotation vector on the sphere (see theory section). The shallow end of the tank is thus analogous to the poleward flank of the ocean basin and the deep end to the tropics.
The action of the wind will be represented by gently blowing air over the surface of the water using fans: two fans will be used, one to represent the westerly wind belt, the other to represent the trade winds. The fans (cooling fans for PC’s work perfectly) are driven by the 12V DC power supply on the turntable. The fans should be attached in the middle of, and perpendicular to the wall, as shown in Fig.1. Clamp the long screw protruding from the back of each fan to the side of the tank (see the green clamps in the figure). The fan must be held tightly and arranged to blow horizontally. The ‘westerly wind’ fan blows parallel to the shallow end of the tank. The ‘easterly wind’ fan blows parallel to the deep end of the tank but in the opposite direction.
The arrangement shown in Fig.1 will create a subtropical gyre which will circulate anticyclonically. Obviously cyclonic circulations can be set up by reversing the fans.
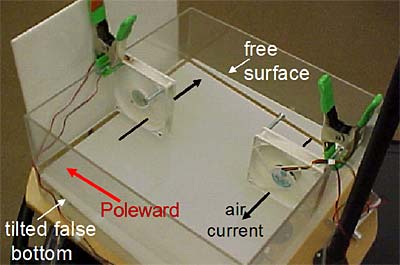
Fig.1. Arrangement of apparatus for the wind driven gyre experiment. A tilted false bottom is used to mimic spherical effects, the shallow end representing the poleward side. Note the position of the free surface of the water clearly showing the fluid shallowing polewards. The fan on the poleward side creates a ‘westerly’ air flow, the fan on the equatorward side an ‘easterly’ air current.
Now add water into the container until the level is approximately 1/2 cm below the fans. Plug both fans in to the DC power supply of the turntable making sure that the sense of polarity is correct. The spin rate of the fans should be turned down (using the potentiometer knob) toward the ‘low end’ so as not to stir up too many waves and ripples on the surface. Ascertain that all the wires and connections are completely on the turntable (no hanging wires!) and then spin up the table to a rotation rate of order 10rpm. Wait for 15 to 20 minutes until the circulation has been established.
The surface flow can be visualized using black paper dots sprinkled on the surface. The flow in the interior and at the bottom can be visualized using dye injected from a pipette.