Introduction | Tank – How to | Tank – Examples | Ocean – Examples | Theory
The experiments described here illustrate the fundamental mechanism behind Rossby waves by investigating the movement of a vortex induced by an ice cube on a rotating beta-plane.
How to Carry Out the Experiment
Ice cube experiment using an inclined plane
Take the clear 16”x16” square tank and position it centrally on the turntable. Next, place inside a snugly fitting white acrylic sheet propped up along one edge to provide a tilted bottom, as shown in Fig.1. The experiment works best if there’s a large tilt. The tank should be arranged so that, viewed from the camera, the shallow end is at the top of the picture and the deep end at the bottom. This ensures that the ‘pole’ is at the top of the field of view.
The varying depth of the tank mimics the variation in the depth of a spherical shell of fluid measured in the direction parallel to the rotation vector on the sphere (see the theory section). The shallow end of the tank is thus analogous to the poleward flank of the fluid and the deep end to the tropics.
Now fill the tank with water so that the water level is up to the top of the slope, and set the table rotating at a speed of around 15 rpm or so. Wait for 15-20 minutes until solid body rotation is obtained by the water – this can be tested by seeing if paper dots dropped onto the surface of the water remain stationary with respect to the rotating frame.
As is demonstrated by the theory, the experiments work best the steeper the slope. A gradient of approximately 0.5 seemed to produce good results. Similarly, increasing the rotation increases ice cube drift speed (although at very high rotation rates the parabolic surface effect begins to have an impact).
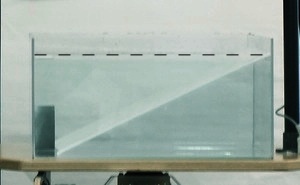
Fig.1. Arrangement of apparatus for the ice cube Rossby wave experiment. A tilted false bottom is used to mimic spherical effects, the shallow end representing the poleward side. The dotted line marks the water level.
Once the system is in solid body rotation, the experiment can begin. Carefully place an ice cube to the “east” of the center of the tank towards the shallower end (this will lead to more rapid movement of the cube). Using a (lightly) dyed ice cube makes the flow patterns around the cube obvious. Large icecubes make the movement and dye patterns more noticeable – an ice cube with a 2” diameter was found to work well.
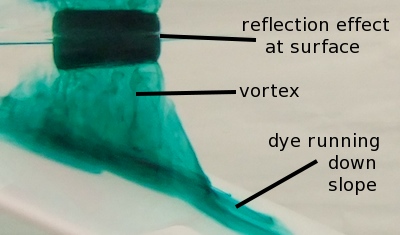
Fig.2. Side view of ice cube floating on water. The dyed ice cube generates a cyclonic vortex as it drags water downwards. As the dye reaches the sloped bottom, it moves “downhill” under gravity.
As the ice cube melts it draws its latent heat of fusion from the water, which thus becomes cold and dense. Water sinks, drawing fluid in from the periphery. By conservation of angular momentum, this causes it to rotate cyclonically relative to the tank.
The ice cube will generate Rossby waves and begin to move “westwards” in a trochoidal (or prolate cycloidal) trajectory as shown in Fig.3:

Fig.3. Prolate cycloidal trajectory.
Paper dots can be used to visualize the surface flow caused by the waves (see Fig.4).
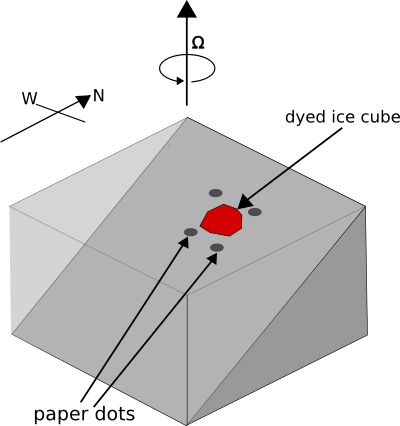
Fig.4. Set-up of ice cube and paper dots in the rotating tank.
Ice cube experiment using a cone
The ice cube experiment can be modified to be more representative of Rossby waves around the polar regions by altering the mechanism used to produce a beta plane. Place the cylindrical insert inside the square tank. Next, place a cone into the tank that fits snugly against the cylindrical insert.
The cone used was constructed from a plastic sheet with the point of the cone removed to make the plastic easier to work with. A slope on the cone of around 1 seemed to work well. Again, the varying depth of the tank mimics the effects of a spherical shell of fluid, although in this case the center of the cone represents the pole, and the edge of the cone represents the equator.
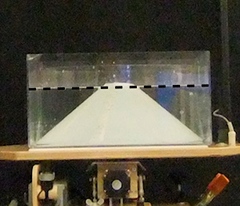
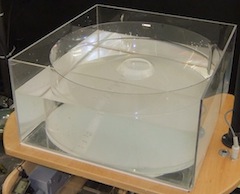
Fig.5. Arrangement of apparatus for the ice cube Rossby wave experiment on a cone. A cone is used to mimic spherical effects, the shallow end representing the poleward side. The dotted line marks the water level.
Now fill the tank with water so that the water level is slightly below the top of the cone, as shown in Fig.5, and set the table rotating at approximately 10rpm. Wait 15-20 minutes for solid body rotation to be attained.
Carefully place the dyed ice cube (an ice cube with a 1” diameter is sufficient, although larger ice cubes lead to clearer Rossby waves) about half way between the center and edge of the cone. As before, the melting of the ice cube leads to the generation of a cylconic vortex, which creates Rossby waves and hence “westward” – or anticyclonic – movement (see Fig. 6). Flow around the ice cube can be expected to locally follow a trochoidal (prolate cycloidal) trajectory, so as a whole the flow will be epitrochoidal (see Fig. 7).

Fig.6. Set-up of ice cube in experiment on a cone. Note that “West” is in a clockwise direction.

Fig.7. Epitrochoidal trajectory about pole.